
In this article, we're going to look at how to host HTTPS servers, limited to our local LAN without that annoying security warning.
These days, serving anything in clear text is considered bad practice and rightfully so! For HTTP servers the standard answer is to use Transport Layer Security (or TLS). This means you get a certificate for your server signed by an authority your browser already trusts. With services like Let's Encrypt, this is now free, automated, and easy to do.
The problem
Sadly, if you are deploying on your Local Area Network (LAN) you cannot get a signature from a pre-trusted authority, so your browser is always going to hate on your internal server. This has been a problem for decades and the problem still remains. The standard answer is to create your own internal certificate authority (CA) and install its public certificate in the browsers of everyone on your LAN. Sadly, this is still the answer.
This sounds daunting and indeed, creating a full-blown CA comes with additional security and management responsibilities. However, in this article, I am going to show you a simple technique you can use for one-off server deploys to satisfy the brower's security check without having to become a full-blown certificate authority. I'll also add some bonus information you can use to expand the technique beyond a single server deploy.
DISCLAIMER: Before we get started, I must make a few disclaimers. When discussing the following technique I will share my thoughts on the security concerns of the technique. However, I am not a security expert and claim no guarantees on the safety of using this technique. If the information and/or servers you need to protect need strong security you should seek the advice of a professional security engineer. The information I share here is for educational purposes only and you are responsible for your own security.
Ok! Let's get started...
Materials needed
This article is mostly informational, so there are no requirements for following
along. I will be demonstrating the techniques though. If you want to re-create
the demonstrations you will need openssl, docker, and docker-compose
installed and a working internet connection to download docker images.
Understanding how the browser connects to an HTTPS server
When I demonstrate something, I want my listeners to understand what it is I'm doing as opposed to just blindy copying and pasting, so I want to cover at a high-level what happens when a browser connects to an HTTPS server. If you already know or are just impatient, jump to the action section.
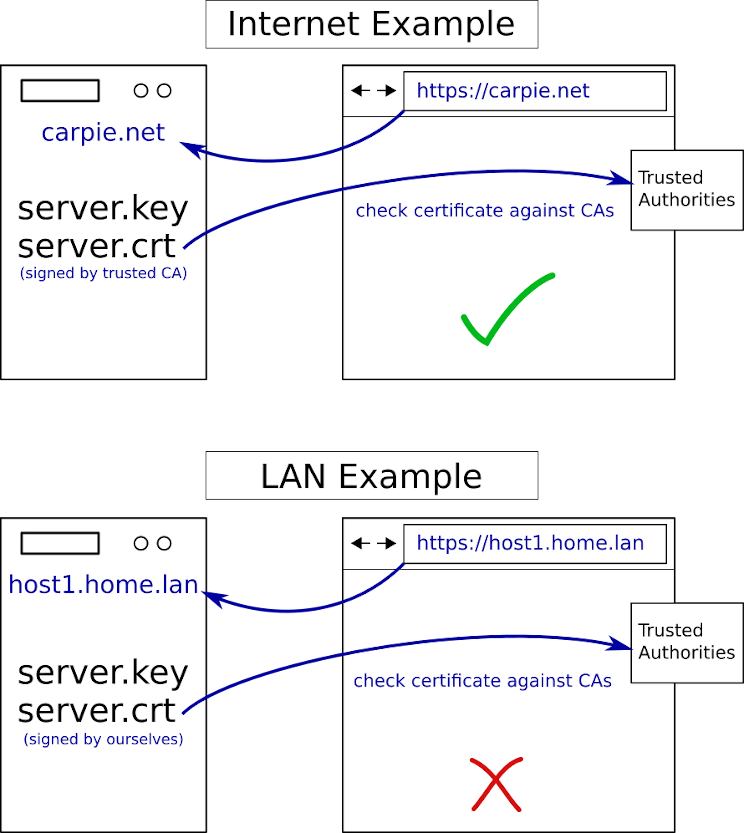
In this example, we have carpie.net, a public HTTPS server, and
host1.home.lan, a LAN HTTPS server. The only difference is how our TLS
certificates are signed. The public one was signed by an authority the
browser already trusts and the LAN one, we signed ourselves. Let's see what
happens when try to visit each server with our browser.
When your browser attempts to make a connection to a TLS protected server, the browser will start what's called a TLS handshake. Responding to this handshake, the server will include its TLS certificate. The browser checks the signature of the certificate against a trusted set of certificate authorities. This set is sometimes built into the browser or in some cases is pulled from a similar operating system itself. In the public case, the certificate signature check passes because the CA is trusted. In our LAN case, it fails because our certificate is not signed by a trusted CA.
The browser also does some additional checks as well, such as checking that the common name field matches the host name. Modern browsers such as Chrome have started requiring the Subject Alternative Name extension field as well, so we'll include this in our certificates.
Ok, let's see how to set up a LAN server and get our browser to trust it.
The one-shot CA technique
Ok, for the server, we know we need a certificate. To do this we need to create a private and public key. From the public key, we create a signing request and have it signed by a certificate authority. The result of the signing is the server's certificate. We've already determined that no public pre-trusted CA is going to sign a certificate for an internal private server, so we'll have to create our own. Then, we'll have to tell our browser to trust our CA as well.
Running your own CA comes with responsibilities. Once you tell a browser to trust it, it will. So, anything signed by the CA will be trusted. This means you need to tightly control the CA secret key and manage lists of certificate that have been revoked. Otherwise, if the key is compromised, then an attacker can sign nefarious certificates and trick our browser into trusting them. That's a lot of additional effort we don't really want to do for own one-off internal server.
One technique to get the same level of security and trust but avoid the responsibility is to create a one-shot CA. This means we'll create a CA private key and public certificate, sign a single server certificate and then delete the CA's private key. We can then add the public CA certificate as a trusted authority to our browser and it will then trust our signed server certificate. However, since we deleted the CA's private key, no other certificates can ever be signed by that CA. It's a single use trusted CA.
It sounds much more complicated than it really is, so let's see it in action...
How to create a one-shot CA
First, we'll setup the CA.
openssl genrsa -aes256 -out ca.key 4096
openssl req -x509 -new -nodes -key ca.key -days 3650 -out ca.pem -subj "/CN=MyCA"
You will be prompted for a password to protect the key. This password will be used for creating the CA certificate and for signing the server certificate.
These operations will create two files, ca.key which is the private key for
the CA (used for signing) and ca.pem, the public certificate key for the CA.
The first command created a common 4096 bit RSA secret key using the AES 256
cipher. The second command used the private to key to create a public x509
certificate that can be freely shared. The -days parameter specificies how
long the certificate is valid for, which basically specifies how long the
browser will trust it. We used 10 years here to make a long lived certificate
for our internal network. You can use a different value if you wish. The
-subj parameter provides information fields in the certificate. There are
a whole host of fields you can fill out but they are not required, so we
used the minimum and just specified Common Name (CN).
Ok, our CA is created, let's create the server key and certificate signing request. These two steps are independent of the CA.
openssl req -nodes -newkey rsa:2048 -keyout server.key -out server.csr -subj="/CN=host1.home.lan"
This command creates a new 2048-bit RSA key and a certificate signing request
(CSR) all in a single command. Again we pass in Common Name. It is important
that the common name be the host name of the internal server we are creating a
certificate for. In this case, our internal host, arbitrarily named
host1.home.lan.
Now that we have the CSR, we need to sign it with our CA key. We need to add
that "Subject Alternative Name" field though for newer browsers.
Unfortunately, with current OpenSSL versions, we cannot specify those as a
parameter, so we need to create a file, v3.ext that will contain the
extensions.
# v3.ext
[EXT]
subjectAltName=DNS.0:host1.home.lan
Now we can sign the certificate, again using the minimal amount of informational fields.
openssl x509 -req -in server.csr -CA ca.pem -CAkey ca.key -CAcreateserial -out server.crt \
-days 3650 -extensions EXT -extfile v3.ext
This command invokes the x509 certificate signer to sign server.csr with the
CA certificate and key we created early. We pass in CAcreateserial to keep
openssl from griping about a missing serial number file. We specify the output
file to be server.crt. Again, we sign for 10 years to keep from having to do
this again anytime soon. Again, the length is totally up to you. Finally we
specify that the x509 extensions from the EXT section of the v3.ext
extension file should be added to the certificate.
The resulting output, server.crt, is our HTTPS server certificate. We will
need that and the server.key file for spinning up our HTTPS server.
Remember, the .crt file is public, and the .key file is secret and should
be protected.
Now, let's clean up the files we don't need. Also, for security reasons, we'll remove the secret key for the CA itself.
rm -f ca.srl server.csr ca.key
By removing the ca.key, we can no longer sign certificates without creating a
new CA key. We can still use the CA certificate ca.pem for trust however! It
will only ever trust the server certificate we just made. So we get the trust
we want, without the responsibility of maintaining and protecting a full blown CA!
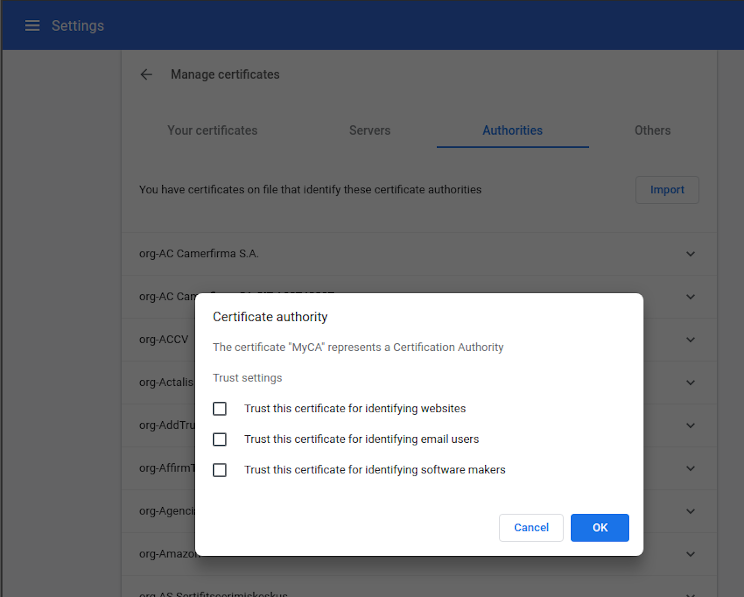
Now let's look how to use these certificates and keys. First we need to make our browser use our CA certificate as a trusted authority. The options for importing can be found under:
- Chrome: Settings -> Privacy and Security -> Security -> Manage Certificates -> Authorities -> Trust this certificate for identifying websites
- Firefox: Preferences -> Privacy and Security -> Certificates -> View Certificates -> Authorities -> Import -> Trust this CA to identify websites
Now let's spin up an HTTPS server in docker to make use of the certificate. For simplicity, we'll use nginx with a custom config in docker-compose. I'm going to show you the files to create, but you can also download off my gitlab repo to save time.
Testing with a local HTTPS server
Let's make our directory structure...
cd ..
mkdir conf.d html
In conf.d, create a file named web.conf with the following contents
server {
    listen 443 ssl;
    server_name host1.home.lan;
    ssl_certificate certs/server.crt;
    ssl_certificate_key certs/server.key;
    ssl_protocols TLSv1.2;
    ssl_ciphers HIGH:!aNULL:!MD5;

    root /usr/share/nginx/html;
}
This is a standard TLS configuration for nginx. The key points are that we
tell nginx to use the server key and the server certificate that we created
in our certs directory.
In html, create a file index.html with the followings contents
<html>
  <head><title>LAN TLS Test</title></head>
  <body><h1>LAN TLS Test</h1></body>
</html>
This is just some sample HTML that nginx will serve when we visit the main page.
Finally, in the base directory create a file name docker-compose.yml with the
following contents
version: '3'
services:
  web:
    image: nginx:latest
    ports:
      - '8443:443'
    volumes:
      - ./conf.d:/etc/nginx/conf.d
      - ./certs:/etc/nginx/certs
      - ./html:/usr/share/nginx/html
This is a docker compose config file that will spin up an nginx image on our
local host port 8443. The volumes section maps the certs, config, and html
directories we just created to the appropriate places inside the nginx image.
Your directory structure should look like this
├── certs
│   ├── ca.key
│   ├── server.crt
│   ├── server.key
│   └── v3.ext
├── conf.d
│   └── web.conf
├── docker-compose.yml
└── html
    └── index.html
The final step before trying this out is making sure that our chosen host name,
host1.home.lan is a valid DNS name. This is important because the browser
will check that the host name matches the Common Name or one of the Subject
Alternate Names in the certificate. If you have a DNS
system
set up for your LAN, you could put the name there. For simplicity in this
example I'm just going to put the name in /etc/hosts.
# Add to /etc/hosts
192.168.0.10    host1.home.lan # Check against our real host in VM
Now, we just start the docker container and try it out!
docker-compose up web
Visit https://host1.home.lan:8443/ in your browser. If everything worked you should see a valid locked icon!

Sadly, you will have to import the CA certificate into every browser you want the site to be trusted in. So, if you have many users (or browsers) on your LAN, this is still not a great option. But for a handful of computers on your home network it is an adequate solution.
Bonus - Certificate options
Now that we know how to create a certificate, let's look at some different types of host certificates we can make. The certificate we just made is the classic single host named certificate. This certificate will work for a host that matches the specified DNS name.
Multiple specific hosts in a single certificate
If we wanted to, using the Subject Alternate Name fields, we could create a single certificate that could be used by two or more hosts by adding those host names as DNS entries in the SAN field. The procedure is the same as above, but the v3.ext file would now look like this
[EXT]
subjectAltName=@alt_names
[alt_names]
DNS.0=host1.home.lan
DNS.1=host2.home.lan
The resulting server.key and server.crt could be used on both the host1
and host2 servers.
Wildcard certificates
If we wanted to create a certificate that can be reused on any named server on
our LAN, we can create a wildcard certificate. To do this, we'd use
*.home.lan as the common name and the single entry in the SAN field. The
v3.ext file would look like this
[EXT]
subjectAltName=DNS.0:*.home.lan
The resulting server.key and server.crt could be used on any host on the
home.lan domain. Obviously this lowers security in that, if the key and cert
is stolen, and a DNS name can be obtained, a bad actor might add a server on
the LAN that would now be automatically trusted by the browsers that have
imported the CA certificate.
Use IP address(es) instead of domain name
All the examples up to now assume we've added /etc/hosts entries for the all
the hosts we're creating certificates for, or have added the hostnames to our
DNS servers. If we don't have a DNS server, or just don't want to bother with it,
we can also make a certificate for a specific IP or a set of IPs. We just need
to use one of the IPs for the common name and list all the IPs in the extension
file. Here's what the v3.ext file would look like.
[EXT]
subjectAltName=@alt_names
[alt_names]
IP.0=192.168.0.42
IP.1=192.168.0.10
The resulting server.key and server.crt could then be used for servers on
both the IPs listed. For example, going to https://192.168.0.42, in this
case, would result in the page loading as a trusted site.
Automation
Now that we understand the certificate creation process and the types of certificates we can create, it makes sense to automate the steps. I've created a bash script that can do everything we've covered in this article.
Conclusion
To summarize, we've learned how the browser site trust system works. We've come up with a one-shot CA certificate creation process than can make a certificate for us without us having to maintain a Certificate Authority for all time. We've learned how to make our browser trust this CA. And finally, we've covered several types of certificates we might want to make for our custom situation.
